My hair cut is screaming fairy this year, so I guess it is back to the
old fall back. Definitely need a new version though. I was tired of
the old one with the big wings and all the plastic leaves glued all
over it. This may be the most comfortable costume yet. I am
deconstructing my mad hatter costume from two years ago to create this
one. T-shirt costumes are the way to go.
Pictures of things done, made, cooked, tried and failed, started and not finished, often with cats holding up the process. Sometimes just pictures of cats. Cats are so helpful.
Tuesday, October 25, 2011
Monday, October 17, 2011
Friday, October 7, 2011
Monday, October 3, 2011
CAT bag
I didn't catch the cats on the project with the camera, but CAT ended
up permanently on the bag. I have been making these for other people
for the last 2 years. I think this one is mine.
up permanently on the bag. I have been making these for other people
for the last 2 years. I think this one is mine.
Sunday, October 2, 2011
Tediousness
The gold shiny fabric I had on hand to make the beak and feet of the
our Braz is about 9 or 10 years old. I have used it in other projects
but this is the first time I am using it with this machine. Between
the age and the fact that my light weight needles are all broken so I
am using a medium/heavy weight needle, after nearly tearing the fabric
through and getting it jammed down into the needle hole several times
over, I am slowly hand sewing the feet, lining the seam with Bom Fim
tape that was handy next to the table. Remind me to never again forgo
buying extra needles and to never again use this fabric for small
detail pieces.
Wednesday, September 28, 2011
Thursday, August 25, 2011
Tuesday, July 12, 2011
A sari

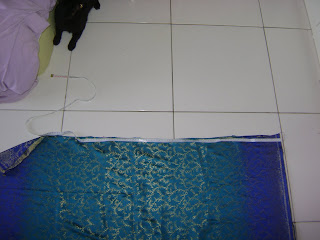
I have a sari I got at the Maua artisan fair a few years ago. It is one of the most comfortable things I own to wear. It's also very very easy to make. I started out with three yards of fabric here.
Cut it in half - each half will be a drapey side of the sari.

This fabric frays like crazy, so I ran a zig zag stitch along the raw edges.
zig zaged.
I also hemmed up the bottom, using the salvage to my advantage.
Then I put right sides together and sewed up the raw edge side about 3/4 of the way up, leaving it open at the top for arm holes.
At this point, you should drape it over yourself and see if the armpit is too low. In this shot it is a bit too low. Please forgive the fact that the shot got uploaded sideways. Blogger is so remedial that there is no photo editing allowed within the blog post, which I find utterly ridiculous, along with the fact that it took over an hour to upload the shots featured in this post. But back to the sari - pinch the top corner together to simulate the the seam so you can get a better measure of the armpit level - if it is too low, when you lean over everyone can see your tatas.
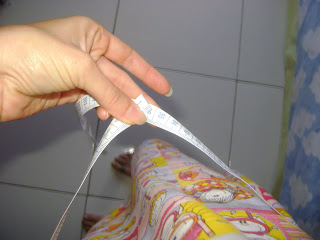
Also check the length - the seam side will hang higher, obviously. This is a good length for the seam side.
This is actually a bit too long for the drapey side, but I'll make due. Ideally, it should be just to your feet. I added small tucks in the folds to make it shorter and it still looked okay, but I had to lift up the sides of this in order to walk and dance in it.
As long as you are mostly satisfied with it at this point, it's time to measure your arm holes and cut your corners off. I left a space of 35 cm for my arms, but your lengths will vary depending on how short you are, how busty, and how much weight you have been lifting (triceps, you know).
Chop off the corner - this will be the seam that goes over your shoulder. Don't worry too much about how wide it is (it may end up wider than your shoulder) because it can be gathered later if need be.
Again, zig zag the raw edge.
Right sides together and sew a strait stitch down, then iron flat out.
Then I tried it on again and found the shoulders to be way too wide for me, so I gathered them.
Then fold over the selvage edge on the top part of the drape and sew a strait stitch all the way around. I finished the armholes with a strait stitch also.
Drape both pieces over your body, one over the other. Let them fall naturally to see where a comfortable center is, pin and tack it down. Do the same for the back.
Again, double check the armpit - mine is still too low here. Adjust as needed.
That's it! Oh, and....
Allow sleepy cat to nap on finished sari.
I do not have a good picture of myself in the sari, maybe I can add that later.
Move over, cat, next project!
Using up some silk
Beginning supplies: some rick racks and trims, tape measure, thread, scissors, large scrap of silk, jacket fabric, pins.

My sogro gave me some sort of fabric that is usually made into suit jackets. It's pretty old and rather discolored in some spaces. I thought it might make a simple skirt. This is a ruff rectangle that I thought would cover my butt.
Measuring the size I will need to pull it up over my butt without buttons or zippers because I don't feel like tackling that for this project.
I had to fight Pila for the scrap of silk: she thought it was a special space for her to sleep.
I'm not sure how long this piece was, but if I had to guess I would say about three yards.
Since this jacket fabric frays like a mofo, I ran a zig zag up the raw edge before folding over and hemming.

Pin and hem.
Elastic for the waist line.

I also cut a 20cm by 20cm square for a pocket because pockets are important.
I thought it would be fun to add rick rack details, but later I decided to sort of cover them up. I also added a small loop for my pocket watch to hook on.
Zig zag the elastic on the top, about 3 cm overlap..
...then fold over and strait stitch for the waistline. Stretch as you go.
Three yards of silk got ruffled down to 100 cm of skirt.
Pin it all down, sort of covering the rick rack - if you pull down the ruff edge, you will still see it. I like the look of ruff edges.
Pin the skirt down the back, right sides together...
.... one strait stitch down the back.
Then I did a short strait stitch folding the seam out.
And here we have a finished skirt. Not sure how much I like the fit, it's a bit "bubbly" on the top part, probably because the jacket fabric is not made to have elastic in it. Also, I think I would have left the pocket on the inside, or made it a bit smaller.
Redoing this project, I would have made the top band smaller and cut off a small layer of the silk to add a band on the top to encase the elastic instead.
On to the next project!
Subscribe to:
Comments (Atom)


